How to build your own equipment
The EM pump that we built using this video put out over 2000 mG about an inch from the box. The only difference from the one in the video, is that we used a slightly larger motor, and added a rheostat to be able to control speed and EMF output.
(Electronic) Electroscope/E-POD
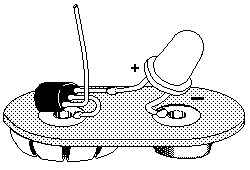
This is the picture I went by to make our electroscopes:
This is the way they first made these, and they used to stick them on top of a 9 volt battery. This is OK and cheap, but not very robust. To make more secure you will need to put these parts inside of a project box, and in between either the positive or negative connections you will need to put a toggle switch, so you can cut if on/off.
Parts consist of:
1 LED any color of your choice
1 Field effect transistor (JFET) : part number is NTE451
1 Mini toggle switch of your choice
1 Project enclosure
1 9 volt battery terminal
1 9 volt battery
You will also need a little bit of extra wire to connect and solder these parts together. Normally you would need to add a resistor to keep the 9 volt battery from burning out the LED as soon as it is connected. You do not need to do this because the JFET acts as a resistor. Notice that the flat side of the JFET in the picture is facing down. The wire sticking straight up in the photo is the antenna leg of the JFET. The longer the wire you add to this the more sensitive it becomes. You may want to experiment a little with the types and length of antennas you add to this leg. The lights are usually on until it detects static electricity, in which it will start to dim or brighten depending on if it is positive or negative charge. Negative dims, Positive brightens.
Some AWESOME videos from the guys at S.A.G.A.P.S.
The 12-587 has a tendency to stop scanning at times. This is the fix for that.
We tried it, and it works. Not much room inside there, so the smaller the switch, the easier it will be for you.
